How to Develop a Full Stack Next.js, FastAPI, PostgreSQL App Using Docker
This is a continuation of previous tutorials on how to build and deploy a full-stack Next.js, FastAPI, and PostgreSQL app.
The branch for this tutorial:
https://github.com/travisluong/nfp-boilerplate/tree/tutorial-3-how-to-develop-using-docker
The complete project:
https://github.com/travisluong/nfp-boilerplate
Docker
Docker is a tool that allows you to run your software in containers. A container is a process and filesystem that is isolated from the processes and filesystem of your host machine. The custom filesystem is provided by a container image. Using docker, you will be able to run your software in a consistent environment every time. This is particularly useful when you have to onboard many developers onto a project and you end up in a situation where it works on one machine, but not the other due to differences in the host machine. Docker alleviates this very common problem.
Setup
The first step is to install Docker Desktop. https://www.docker.com/
Once you have downloaded and installed it, you are ready for the next step.
Open up the nfp-boilerplate project in VSCode or whichever text editor you use.
Building and running containers
The images used in this tutorial can be found on Docker Hub. We are using the official python and node images.
Backend
Create Dockerfile in nfp-backend.
FROM python:3.9

WORKDIR /usr/src/app

COPY requirements.txt ./
RUN pip install --no-cache-dir -r requirements.txt

COPY . .

CMD [ "uvicorn", "main:app", "--reload", "--host", "0.0.0.0" ]
In .env, you will want to change the localhost string in your DATABASE_URL to host.docker.internal. It should look something like this.
DATABASE_URL=postgresql://nfp_boilerplate_user:password@host.docker.internal/nfp_boilerplate_devThis allows the app inside the container to connect to the PostgreSQL instance running on your host machine.
Build the image.
$ docker build -t nfp-backend .The -t flag tags the images.
Run the container.
$ docker run -p 8000:8000 -it --rm --name nfp-backend-running nfp-backend- The
-pflag maps the host port to the container port.HOST:CONTAINER - The
-iand-tflags are commonly used in combination for terminal access. It is shortened to-it. - The
--rmflag ensures container is automatically removed when it exists. nfp-backend-runningis the name of the running container.nfp-backendis the name of the image.
Frontend
Create Dockerfile in nfp-frontend.
FROM node:16

WORKDIR /usr/src/app

COPY package.json ./
RUN npm install

COPY . .

CMD [ "npm", "run", "dev" ]
CD into nfp-frontend and run the build:
$ docker build -t nfp-frontend .Run the container:
$ docker run -p 3000:3000 -it --rm --name nfp-frontend-running nfp-frontendBind Mounts
You’ve learned how to build and run a container, however, this isn’t the ideal way to develop because changes to your files on your host filesystem won’t be reflected in the container. To remedy this issue, you can use a bind mount.
$ docker run -p 8000:8000 -it --rm --name nfp-backend-running -v "$PWD":/usr/src/app nfp-backendThe -v "$PWD":/usr/src/app will map your current directory to the /usr/src/app directory in the container. Now, the changes you make will be reflected in the container.
For the frontend, you will have to create this .babelrc file:
{
    "presets": ["next/babel"]
}
Otherwise, you’ll get this error: error - Failed to load SWC binary, see more info here: https://nextjs.org/docs/messages/failed-loading-swc
The bind mount can now be used for the frontend:
$ docker run -p 3000:3000 -it --rm --name nfp-frontend-running -v "$PWD":/usr/src/app nfp-frontendDocker Compose
These docker commands can get quite long and unwieldy to type out. Docker Compose allows you to write all of the configurations into a YAML file and run everything in a single command.
Create a docker-compose.yml in the project root.
version: "3.9"

services:
  backend:
    build: nfp-backend
    ports:
      - 8000:8000
    volumes:
      - ./nfp-backend:/usr/src/app
  frontend:
    build: nfp-frontend
    ports:
      - 3000:3000
    volumes:
      - ./nfp-frontend:/usr/src/app
Run docker compose:
$ docker compose upWith one command, you can build and run all of the containers at the same time.
Database container
Let’s add a Postgres container to our docker setup. Add the following to the docker-compose.yml under services.
  db:
    image: postgres:14
    restart: always
    environment:
      POSTGRES_USER: nfp_boilerplate_user
      POSTGRES_DB: nfp_boilerplate_dev
      POSTGRES_PASSWORD: password
Since we’re changing from using the database instance running on our host to the one running inside of the container, we’ll have to change our database host in .env and alembic.ini.
In .env:
DATABASE_URL=postgresql://nfp_boilerplate_user:password@db/nfp_boilerplate_devIn alembic.ini:
sqlalchemy.url = postgresql://nfp_boilerplate_user:password@db/nfp_boilerplate_devNotice that the host has changed to db in both files.
Type ctrl+c to shut down the currently running process.
Then run docker compose again:
$ docker compose upWe will need to run the migrations again since this is a new DB.
Open a terminal into the backend container. First, start by checking the running docker processes.
$ docker psThen run this:
$ docker exec -it nfp-boilerplate_backend_1 bashNote: Make sure the container name matches what was listed from the docker ps.
Inside of the container, run migrations:
$ alembic upgrade headThen, exit the container:
$ exitOpen a terminal into the database container:
$ docker exec -it nfp-boilerplate_db_1 bashOpen a psql session:
$ psql -U nfp_boilerplate_user nfp_boilerplate_devVerify that the tables were created.
# \dtVerify the app is still functioning in by going to http://localhost:3000/notes in your browser.
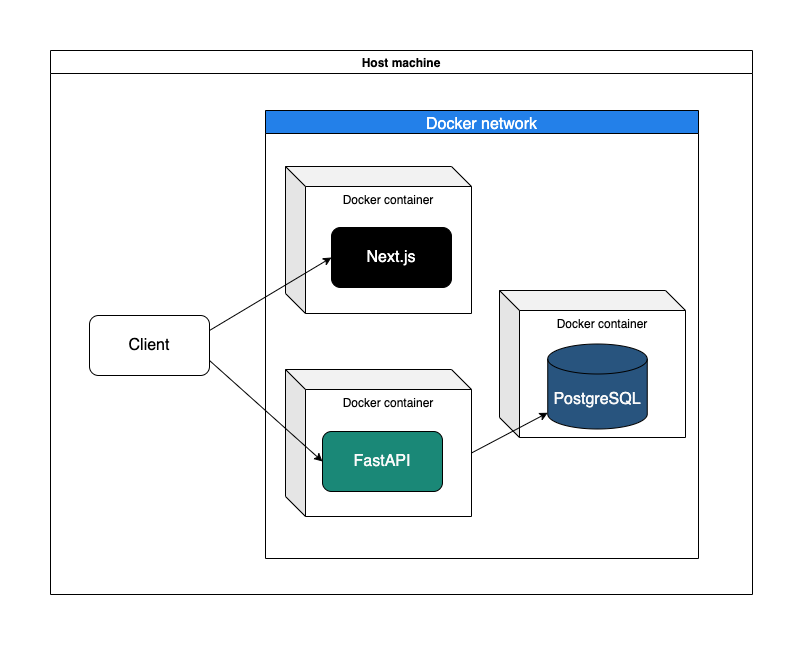
Docker networks
It is worth mentioning that Docker Compose manages the entire setup of the Docker network. All the services in your docker-compose file will be able to communicate with each other by their hostname, which is automatically set to their service name. For example backend, frontend, and db.
For example, inside of the frontend container, you can call the backend and vice versa:
$ curl backend:8000This is why we were able to change the database host to db in the database settings.
Named volumes
If you’d like to persist your database data, you can use a named volume to do so.
Add the following to the docker-compose.yml:
    volumes:
      - pgdata:/var/lib/postgresql/data

volumes:
  pgdata:
The final docker-compose.yml should look like this:
version: "3.9"

services:
  backend:
    build: nfp-backend
    ports:
      - 8000:8000
    volumes:
      - ./nfp-backend:/usr/src/app
  frontend:
    build: nfp-frontend
    ports:
      - 3000:3000
    volumes:
      - ./nfp-frontend:/usr/src/app
  db:
    image: postgres:14
    restart: always
    environment:
      POSTGRES_USER: nfp_boilerplate_user
      POSTGRES_DB: nfp_boilerplate_dev
      POSTGRES_PASSWORD: password
    volumes:
      - pgdata:/var/lib/postgresql/data

volumes:
  pgdata:
Type ctrl+c to shut down the docker compose process.
Then run:
$ docker compose downThen bring the containers back up with:
$ docker compose upThe data in the container should have persisted. Without the named volume, the data would be wiped forever if the image gets removed.
To see your volumes:
$ docker volume lsConclusion
Congratulations. You have set up a consistent development environment with Docker. If you find yourself running into the “It works on my machine” problem often, then consider taking a look at Docker. A small investment now might save you and your team wasted hours in the future.